
Monday, April 30, 2012
**Oooops! Correction to Monogrammed Hat Post**
I do not use cutaway stabilizer for these. I use TEAR AWAY! Item #TM20A at www.sewingmachine.com So sorry for the confusion!
Monogrammed Straw Hats
 I was re-inspired over the weekend when I walked into church & saw my Aunt waiting for my family to join her in her straw hat from last year. She had been in Savannah the weekend before & said that she got so many compliments on it. One lady even told her, "It looks so expensive!" Shhhhh, no secret telling here! Then later in the afternoon, I see this picture on Facebook where teenagers are enjoying some of the hats I've monogrammed this year on their Spring break trip. They have been & continue to be a huge hit!
Now, on to the reason you're here.....
Here's a "how to" on my method. I've seen lots of these in FB groups that I follow, so I know many ladies have their own methods. Hopefully, this will help some "newbies" get started and then you may be able to develop your favorite ways too.
 Here's the hat on the hoop. I keep it simple & always use my 4x4 hoop with a 3" tall center letter. I've lost count of how many I've done like this. Customers seem to be happy with this size, so I stick with it. If I changed the monogram size now, it may cause an uprising! I hoop 2.0 oz tear away stabilizer purchased from Sewing Machine.com. Then I lay the hat on hoop eyeballing (is that a real word ?) each side to make sure it's square in the hoop. Then I put 3 pins through the hat & stabilizer. I do NOT use spray. I used to until about 6-7 hats ago. But it just became too much of a burden to pick away the stabilizer from the back. I tried without it & it works just fine! Step skipped=I love it!
  This is the hat on the hoop on my machine. I have a Brother Duetta 4500 D. Yes, she's "topless" in a sense due to some auto threading issues, but that's a post for another day. I have the cover off so I can see how to manually pull the thread up & around & through the tunnel. If I ever catch up on hats, I'll get this fixed. For now, I'm making do.
 I almost always use Monogram Wizard Plus' Master Circle or MC Center fonts. I change the letter width to 200 & I choose to use the underlay stitches for good coverage on the hat. I move the needle down to where the bottom of the monogram will be & I adjust so that the needle is in the middle of the second "lane" around the hat. I've recently taken up running & this reminds me of a track. (Sad & weird, I know.) Oh!....don't forget to rotate your design either in your software or once you get it to the machine!
  Before I start stitching, I lay a precut piece of Solvy on top & away we go! With a 3" tall center letter & underlay, usually my hat monograms are about 8,000 stitches & this takes about 16 minutes on my machine. I don't run it on 1000 spm because it just makes me nervous.
And in the time it took me to write this post, another hat is done! Thanks for stopping by & Happy Stitching!
Saturday, March 10, 2012
How to cut a straight edge on burlap
If you've spent any time around me lately, you may have picked up on my interest obsession with burlap. Burlap flowers, burlap pillows, burlap table runners, burlap Pinterest boards....Burlap is even used to decorate my Sunday School room, but I take no credit there, although it does make me very happy!
On my mission to incorporate burlap into so many projects, I've learned some things along the way. #1 - you can iron burlap (just not with your good iron that you iron Hubby's white dress shirts with) and #2 - how to cut a straight edge on burlap. And this is what I'm sharing today....
Burlap is known for fraying. A little fraying is good, but you don't want strings hanging off of your projects to constantly monitor & trim. This technique gives you a good straight edge and just the right amount of fraying.


And here is it! An outdoor pillow with 2" flange. Ok...so there's some sewing in there, but that's for another post.

On my mission to incorporate burlap into so many projects, I've learned some things along the way. #1 - you can iron burlap (just not with your good iron that you iron Hubby's white dress shirts with) and #2 - how to cut a straight edge on burlap. And this is what I'm sharing today....
Burlap is known for fraying. A little fraying is good, but you don't want strings hanging off of your projects to constantly monitor & trim. This technique gives you a good straight edge and just the right amount of fraying.
First measure the length you'll need. I needed a 20x20 square.

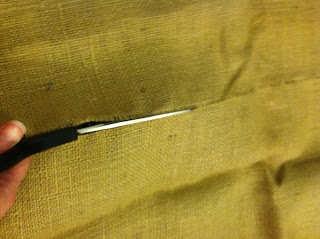
If you look closely, you'll be able to see the threads in the loose weave of the burlap. You're going to separate one of those threads next. Just snip on each side with your OLD scissors.
Choose a nice thick one thread!

Then, you want to gently pull it out.....all the way out. Or in my case, a little more than 20".

Just keep pulling, just keep pulling.....take your time.
The first time I did this, my immediate thought was "Ooooh, burlap ruffles....how pretty!"

Now, when you have the thread pulled out, see what is left for you?
A perfectly straight line for cutting! Magic!
If your thread breaks when pulling, just cut to where it broke, grab it again & keep on pullin'...

Now cut straight up that line. (and excuse the blurry pic)

Now, when you've gone around all 4 sides using this technique, you'll have a square piece of burlap ready for your project.
Remember you can iron burlap. But I'd recommend using a pressing cloth or an old iron.

And here is it! An outdoor pillow with 2" flange. Ok...so there's some sewing in there, but that's for another post.

I hope you'll be able to use this technique in your burlap endeavors. If you try it & love it, I'd love to hear all about it!
Wednesday, August 3, 2011
NEW PROJECT - Reverse Applique
Last night (well, actually in the wee hours of this morning), I did my first reverse applique. This is when the main item, a shirt in my case, is trimmed off of or away from a fabric that is placed underneath. I'd been wanting to try one of these designs. So when I monogrammed a shirt that I wasn't happy with, that gave me the perfect opportunity! Bye Bye monogram. Hello Cute 'Lil Apple! The new shirt is perfect for back to school or Fall apple picking!
Here's where I started...this monogram will be cut out in a later step. I have the fabric that will be the apple underneath the shirt inside the hoop.
I took this next picture because I was amused by the machine's report that this takes 6 minutes. That's 6 minutes of stitching - doesn't include choosing the design, thread & fabric, hooping the shirt, trimming, ironing, etc. It'll be worth it in the end.
Anyway....I rotated the design 90 degrees and away we go.....

The tack down stitching is done & the monogram is trimmed away. (Except for that small little bit at the top, but I'll take care of that.) Then there is a decorative stitch that goes around the apple to hold everything secure. The inside edges of the knit won't fray.

There you have it! And I've now added apples & caramel dip to the grocery list! YUM!

Thursday, May 26, 2011
From Blah to Ta-Da!
Recently, I discovered http://www.meringuedesigns.net/. She sells wonderfully digitized modern embroidery & applique designs. I purchased the Scribbled Daisy design last night and I see many more purchases in the future! Just wanted to take the time to show how I brought new life to this plain white t-shirt.


Nothing exciting here.....
Ta-Da!!

Here's the neat part! Instead of turning to my fabric stash, I turned to the stash of clothes that I know I'll never wear again - primarily due to the fact that THEY DON'T FIT & I'm in DENIAL about the fact that they NEVER will again. So for my sewing & applique friends, don't fret over clothes that are too small or accidentally get dried in the dryer! Cut them up and "re-purpose" the fabric!   |
Close up - love the scribbles! Shirt I haven't worn in years |
A New Look!
Thanks to Facebook, our world is a lot smaller than it once was. I've met and done business with people in many places in the US and even a sweet lady in the UK. Just a quick "Thank You" to http://www.facebook.com/CherishedMemories who helped me with redesigning this blog, my logo & business cards! Even though our correspondence was only virtual, I feel like she could have been a friend just down the street. I love The Plaid Pineapple's new look!!
Tuesday, April 19, 2011
Sewing For Those I Love
One of the greatest things about sewing is that I'm able to give someone a one of a kind, personalized gift. I love thinking about the person while I'm choosing fabrics and patterns & hope that they will enjoy using their gift as much as I enjoy making for them.
The latest gift is a laundry bag for my niece, Brittany. She turned 18 yesterday & is college bound in the Fall! So, I am hoping her gift will serve her well as she goes down this new road of freedom & responsibility - laundry responsibility!
I sort of had this blog post planned in my head so I took pictures along the way. But as my Daddy used to say, "I've just hit the high spots." This is not intended to be a tutorial but hopefully it may inspire you to try some of the techniques like zippers, buttonholes & french seams.
Before I go any further, let me stop at give credit to http://sew4home.com/projects/storage-solutions/667-back-to-school-drawstring-dorm-laundry-bag for the clear and easy to follow pattern.

In my world, good things become great when personalized. So I had to choose a color for a "B" on the pocket. Which do you like? I'll show you what I decided on later in the finished product.... (no cheating & scrolling to the bottom)


 Almost done...after I attached the bottom circle to the bottom of the bag, I finished that seam using the serger. This gets rid of all the straggling strings and reinforces the seam for when my niece feels like she can stuff one more pair of jeans into the bag. (Sorry the pics are so dark)

I didn't get pics of the strap construction (told you in beginning this was just the "high spots") But this is finished strap that connects the top & bottom of the bag.

 Do you like the color I used for the "B"?
The latest gift is a laundry bag for my niece, Brittany. She turned 18 yesterday & is college bound in the Fall! So, I am hoping her gift will serve her well as she goes down this new road of freedom & responsibility - laundry responsibility!
I sort of had this blog post planned in my head so I took pictures along the way. But as my Daddy used to say, "I've just hit the high spots." This is not intended to be a tutorial but hopefully it may inspire you to try some of the techniques like zippers, buttonholes & french seams.
Before I go any further, let me stop at give credit to http://sew4home.com/projects/storage-solutions/667-back-to-school-drawstring-dorm-laundry-bag for the clear and easy to follow pattern.

In my world, good things become great when personalized. So I had to choose a color for a "B" on the pocket. Which do you like? I'll show you what I decided on later in the finished product.... (no cheating & scrolling to the bottom)
The double row of top stitching gives it a professional look! Can't take credit for that though...pattern told me to do it. This shows the two pieces being joined together in the middle.

If you sew and do not own Steam-a-Seam, so get some today!
 Steam-a-Seam, so get some today!
 I think I paid $3.55 for this package at the "expensive" quilting shop in town, so I'm sure you can find cheaper at Hobby Lobby or Joann's with coupon. But, it's worth every penny! It makes zippers much easier to attach & helps hold hems down for sewing.
The pattern called for turning the pocket sides in 1/2" all the way around. I had chosen outdoor fabric for durability and folding that thickness only 1/2" would have been tough without help from my friend "SAS". I also use this when I attach ric rac or ribbon to projects.
Did I mention this was outdoor fabric? Sooooo, maybe if I'd used a heavy duty needle, this wouldn't have happened!? The thickness of the fabric and the zipper teeth were just too much and I broke a needle sewing the pocket on....into THREE pieces! It happens...
French Seams are SEW cool!! I am a visual learner, so the first time I did a FS, I just had to do what the pattern told me to do and see the finished result before I "got it". Just take some scrap pieces and play with them to see how this works.
The bag is sewn up on the side using a french seam. First, you sew WRONG sides together first (I know, I know....this is NOT how you normally do it!) Then you trim really close to seam (1/8") See pics...


Then you fold RIGHT sides together (like you were taught) and sew a 3/8" seam. This will enclose the raw edges of your first seam. (See pic below) You can go back & top stitch if you like. I didn't do this here since it's a laundry bag, not a wedding dress!
Try a french seam in projects like pillow cases or bags when you want a nice finished seam on the inside. I have a serger, but there are times when I think french seams are better. And anyone with a regular sewing machine can do them!

The pattern called for a 1" button hole to run the draw string through. I LOVE doing these on the machine and wonder how they were done before this little contraption was invented. I have my mother's OLD sewing machine and the button hole attachment looks like a surgical instrument! I'll just leave it at that.

My sewing friends who are "anti-pinning" are probably going to go a little nutty here. I'm a fan of pinning because it saves time in the long run when you check and see that all your fabric got caught in your seam. YAY! The writer of this pattern has some really cool math to back up how the circumference of this circle matches the raw edges of the bottom...when I got to the reference to "Pi", I decided to just take their word for it! So, pin, pin, pin & trust the math!


I didn't get pics of the strap construction (told you in beginning this was just the "high spots") But this is finished strap that connects the top & bottom of the bag.

This pocket was my favorite feature of the bag. It can hold change for laundry, student ID, keys and it is perfect for Mom to stash a little green into when she sends her Baby Girl back to school.
 Do you like the color I used for the "B"?
 The pattern didn't give a finished size for this bag, but it is HUGE & I just love it! It was such a fun project & I hope she likes it!
Subscribe to:
Posts (Atom)